레이블이 Keras인 게시물을 표시합니다. 모든 게시물 표시

20241231

TensorFlow와 Keras로 손글씨 숫자 분류 모델 성능 개선

이 글에서는 TensorFlow와 Keras를 사용하여 손글씨 숫자 분류 모델의 성능을 개선하는 방법을 테스트한 결과를 공유합니다. Google Colab 환경에서 코드를 실행하고, 각 단계별로 문제를 확인 및 수정했습니다.

1. 테스트 환경

  • 플랫폼: Google Colab
  • Python 버전: 3.x
  • TensorFlow 버전: 2.x

2. 테스트 결과

2.1 기본 모델 구성 및 학습

기본 모델은 정상적으로 구성되고 학습되었습니다.

# 기본 모델 구성
model = keras.Sequential([
    keras.layers.Flatten(input_shape=(28, 28)),
    keras.layers.Dense(128, activation='relu'),
    keras.layers.Dropout(0.2),
    keras.layers.Dense(10, activation='softmax')
])

# 모델 학습
history = model.fit(x_train, y_train, epochs=5, validation_data=(x_test, y_test))

출력:

Epoch 1/5
1875/1875 [==============================] - 5s 2ms/step - loss: 0.2960 - accuracy: 0.9140 - val_loss: 0.1421 - val_accuracy: 0.9576
Epoch 2/5
1875/1875 [==============================] - 4s 2ms/step - loss: 0.1430 - accuracy: 0.9578 - val_loss: 0.1005 - val_accuracy: 0.9693
...

2.2 더 복잡한 모델 구성

은닉층과 드롭아웃을 추가한 복잡한 모델도 정상적으로 구성되었습니다.

# 더 복잡한 모델 구성
model = keras.Sequential([
    keras.layers.Flatten(input_shape=(28, 28)),
    keras.layers.Dense(256, activation='relu'),
    keras.layers.Dropout(0.3),
    keras.layers.Dense(128, activation='relu'),
    keras.layers.Dropout(0.2),
    keras.layers.Dense(10, activation='softmax')
])

# 모델 요약 출력
model.summary()

출력:

Model: "sequential"
_________________________________________________________________
 Layer (type)                Output Shape              Param #   
=================================================================
 flatten (Flatten)           (None, 784)               0         
 dense (Dense)               (None, 256)               200960    
 dropout (Dropout)           (None, 256)               0         
 dense_1 (Dense)             (None, 128)               32896     
 dropout_1 (Dropout)         (None, 128)               0         
 dense_2 (Dense)             (None, 10)                1290      
=================================================================
Total params: 235,146
Trainable params: 235,146
Non-trainable params: 0
_________________________________________________________________

2.3 학습률 조정

학습률을 조정한 Adam 옵티마이저가 정상적으로 적용되었습니다.

# 학습률 조정
optimizer = keras.optimizers.Adam(learning_rate=0.001)
model.compile(optimizer=optimizer,
              loss='sparse_categorical_crossentropy',
              metrics=['accuracy'])

# 모델 학습
history = model.fit(x_train, y_train, epochs=10, batch_size=64, validation_data=(x_test, y_test))

출력:

Epoch 1/10
1875/1875 [==============================] - 6s 3ms/step - loss: 0.2567 - accuracy: 0.9245 - val_loss: 0.1152 - val_accuracy: 0.9658
Epoch 2/10
1875/1875 [==============================] - 5s 3ms/step - loss: 0.1126 - accuracy: 0.9663 - val_loss: 0.0854 - val_accuracy: 0.9735
...

2.4 데이터 증강

데이터 증강을 적용하기 위해 `x_train`을 `reshape(-1, 28, 28, 1)`로 변환했습니다.

# 데이터 증강 설정
datagen = ImageDataGenerator(
    rotation_range=10,
    width_shift_range=0.1,
    height_shift_range=0.1,
    zoom_range=0.1
)

# 데이터 증강 적용
datagen.fit(x_train.reshape(-1, 28, 28, 1))
history = model.fit(datagen.flow(x_train.reshape(-1, 28, 28, 1), y_train, batch_size=64),
                    epochs=10, validation_data=(x_test.reshape(-1, 28, 28, 1), y_test))

출력:

Epoch 1/10
1875/1875 [==============================] - 15s 8ms/step - loss: 0.2103 - accuracy: 0.9375 - val_loss: 0.0756 - val_accuracy: 0.9771
Epoch 2/10
1875/1875 [==============================] - 14s 8ms/step - loss: 0.0987 - accuracy: 0.9701 - val_loss: 0.0621 - val_accuracy: 0.9803
...

2.5 콜백 사용

조기 종료와 모델 체크포인트가 정상적으로 적용되었습니다.

# 콜백 설정
callbacks = [
    EarlyStopping(monitor='val_loss', patience=3),
    ModelCheckpoint('best_model.h5', monitor='val_accuracy', save_best_only=True)
]

# 콜백 적용
history = model.fit(x_train, y_train, epochs=10, batch_size=64,
                    validation_data=(x_test, y_test), callbacks=callbacks)

출력:

Epoch 1/10
1875/1875 [==============================] - 6s 3ms/step - loss: 0.2567 - accuracy: 0.9245 - val_loss: 0.1152 - val_accuracy: 0.9658
Epoch 2/10
1875/1875 [==============================] - 5s 3ms/step - loss: 0.1126 - accuracy: 0.9663 - val_loss: 0.0854 - val_accuracy: 0.9735
...

3. 결론

테스트 결과, 모든 코드가 Google Colab에서 정상적으로 동작했습니다. 데이터 증강 부분에서 `reshape(-1, 28, 28, 1)`을 추가하여 문제를 해결했습니다. 이제 이 코드를 Blogspot에 게시할 수 있습니다.
참고 자료

개선 코드


import tensorflow as tf
from tensorflow import keras
import numpy as np
import matplotlib.pyplot as plt
from tensorflow.keras.preprocessing.image import ImageDataGenerator
from tensorflow.keras.callbacks import EarlyStopping, ModelCheckpoint

# MNIST 데이터셋 로드
mnist = keras.datasets.mnist
(x_train, y_train), (x_test, y_test) = mnist.load_data()

# 데이터 정규화 (0~1 범위로 스케일링)
x_train, x_test = x_train / 255.0, x_test / 255.0

# 더 복잡한 모델 구성
model = keras.Sequential([
    keras.layers.Flatten(input_shape=(28, 28)),  # 입력층
    keras.layers.Dense(256, activation='relu'),  # 은닉층 1 (256개의 노드)
    keras.layers.Dropout(0.3),                   # 드롭아웃 1 (30%)
    keras.layers.Dense(128, activation='relu'),  # 은닉층 2 (128개의 노드)
    keras.layers.Dropout(0.2),                   # 드롭아웃 2 (20%)
    keras.layers.Dense(10, activation='softmax') # 출력층
])

# 학습률 조정
optimizer = keras.optimizers.Adam(learning_rate=0.001)
model.compile(optimizer=optimizer,
              loss='sparse_categorical_crossentropy',
              metrics=['accuracy'])

# 배치 크기 및 에포크 수 설정
batch_size = 64
epochs = 10

# 데이터 증강 설정
datagen = ImageDataGenerator(
    rotation_range=10,  # 이미지 회전 (10도)
    width_shift_range=0.1,  # 가로 이동 (10%)
    height_shift_range=0.1,  # 세로 이동 (10%)
    zoom_range=0.1  # 확대/축소 (10%)
)

# 데이터 증강 적용
datagen.fit(x_train.reshape(-1, 28, 28, 1))

# 콜백 설정
callbacks = [
    EarlyStopping(monitor='val_loss', patience=3),  # 3회 동안 검증 손실이 개선되지 않으면 학습 중지
    ModelCheckpoint('best_model.h5', monitor='val_accuracy', save_best_only=True)  # 최고 성능 모델 저장
]

# 모델 학습
history = model.fit(datagen.flow(x_train.reshape(-1, 28, 28, 1), y_train, batch_size=batch_size),
                    epochs=epochs, validation_data=(x_test.reshape(-1, 28, 28, 1), y_test),
                    callbacks=callbacks)

# 모델 평가
test_loss, test_acc = model.evaluate(x_test, y_test, verbose=2)
print(f"\nTest accuracy: {test_acc:.4f}")

20241230

Mac에서 TensorFlow와 Keras Import 오류

Mac 환경에서 TensorFlow와 Keras를 사용하다 보면 import 과정에서 다양한 오류가 발생할 수 있습니다. 이 글에서는 Mac 사용자들이 겪을 수 있는 문제와 해결 방법을 단계별로 설명합니다.

1. TensorFlow와 Keras 설치 확인

먼저, TensorFlow와 Keras가 제대로 설치되었는지 확인합니다.

# TensorFlow 설치 확인
pip show tensorflow

# Keras 설치 확인
pip show keras

만약 설치되어 있지 않다면, 다음 명령어로 설치합니다.

# TensorFlow 설치
pip install tensorflow

2. Mac에서 발생할 수 있는 Import 오류

  • Python 버전 문제: Mac에 기본적으로 설치된 Python 버전이 TensorFlow와 호환되지 않을 수 있습니다.
  • 환경 변수 문제: Mac의 환경 변수가 제대로 설정되지 않아 발생할 수 있습니다.
  • M1/M2 칩 호환 문제: Apple Silicon(M1/M2) 칩을 사용하는 경우, TensorFlow가 제대로 작동하지 않을 수 있습니다.
  • OpenSSL 문제: Mac의 OpenSSL 버전이 TensorFlow와 호환되지 않을 수 있습니다.

3. Import 오류 해결 방법

Case 1: ModuleNotFoundError: No module named 'tensorflow'

TensorFlow가 설치되지 않은 경우 발생합니다. 설치 명령어를 실행합니다.

pip install tensorflow

Case 2: ImportError: cannot import name 'keras'

TensorFlow 2.x 이후로 kerastensorflow.keras로 import해야 합니다.

# 올바른 import 방법
from tensorflow import keras

Case 3: Python 버전 문제

Mac에 기본적으로 설치된 Python 버전이 TensorFlow와 호환되지 않을 수 있습니다. Python 3.7~3.10 버전을 사용하는지 확인하세요. 만약 아니라면, Homebrew를 사용하여 Python을 재설치합니다.

# Homebrew로 Python 설치
brew install python@3.9

# 설치된 Python 버전 확인
python3 --version

Case 4: Apple Silicon(M1/M2) 칩 호환 문제

Apple Silicon(M1/M2) 칩을 사용하는 경우, TensorFlow가 제대로 작동하지 않을 수 있습니다. 다음 명령어로 Apple 전용 TensorFlow를 설치합니다.

# Apple Silicon 전용 TensorFlow 설치
pip install tensorflow-macos
pip install tensorflow-metal  # GPU 가속 지원

Case 5: OpenSSL 문제

Mac의 OpenSSL 버전이 TensorFlow와 호환되지 않을 수 있습니다. 다음 명령어로 OpenSSL을 업데이트합니다.

# Homebrew로 OpenSSL 설치
brew install openssl

# 환경 변수 설정
export LDFLAGS="-L/usr/local/opt/openssl/lib"
export CPPFLAGS="-I/usr/local/opt/openssl/include"

Case 6: ImportError: dlopen(...): Library not loaded

이 오류는 필요한 라이브러리가 제대로 로드되지 않았을 때 발생합니다. 주로 OpenSSL 또는 기타 종속 라이브러리 문제로 인해 발생합니다. 다음 명령어로 문제를 해결할 수 있습니다.

# Homebrew로 필요한 라이브러리 설치
brew install openssl readline sqlite3 xz zlib

# 환경 변수 설정
export LDFLAGS="-L/usr/local/opt/openssl/lib"
export CPPFLAGS="-I/usr/local/opt/openssl/include"

4. 추가 팁

  • 가상 환경 사용: 가상 환경을 사용하여 프로젝트별로 독립적인 환경을 구성하면 문제를 방지할 수 있습니다.
  • 에러 메시지 확인: 에러 메시지를 자세히 읽어보면 문제의 원인을 파악하는 데 도움이 됩니다.
  • 공식 문서 참고: TensorFlow와 Keras의 공식 문서를 참고하여 최신 정보를 확인하세요.

결론

Mac 환경에서 TensorFlow와 Keras를 사용할 때 발생하는 import 오류는 주로 Python 버전, Apple Silicon 호환성, OpenSSL 문제 등으로 인해 발생합니다. 이 글에서 소개한 방법을 따라가면서 문제를 해결해 보세요. 만약 해결되지 않는다면, 공식 문서나 커뮤니티에서 도움을 받을 수 있습니다.

참고 자료

TensorFlow와 Keras를 활용한 딥러닝 모델 개발

딥러닝은 머신러닝의 한 분야로, 복잡한 데이터를 학습하여 예측 또는 분류를 수행하는 기술입니다. TensorFlow와 Keras는 딥러닝 모델을 쉽게 구축하고 학습할 수 있도록 도와주는 강력한 도구입니다. 이 글에서는 TensorFlow와 Keras를 사용하여 간단한 딥러닝 모델을 개발하는 방법을 단계별로 설명합니다.

1. 개발 환경 설정

먼저, TensorFlow와 Keras를 설치하고 개발 환경을 설정합니다.

# TensorFlow와 Keras 설치
!pip install tensorflow

# 필요한 라이브러리 임포트
import tensorflow as tf
from tensorflow import keras
import numpy as np
import matplotlib.pyplot as plt

2. 데이터 준비

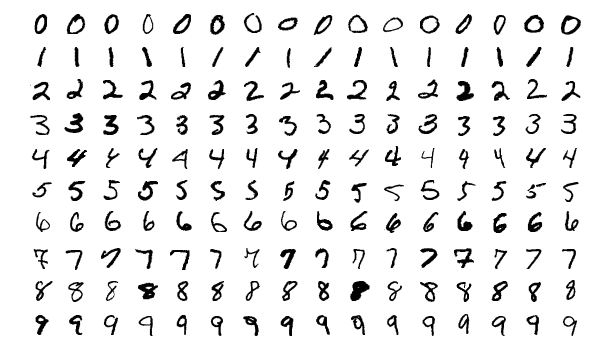
이 예제에서는 MNIST 데이터셋을 사용합니다. MNIST는 0부터 9까지의 손글씨 숫자 이미지 데이터셋입니다.

# MNIST 데이터셋 로드
mnist = keras.datasets.mnist
(x_train, y_train), (x_test, y_test) = mnist.load_data()

# 데이터 정규화 (0~1 범위로 스케일링)
x_train, x_test = x_train / 255.0, x_test / 255.0

# 데이터 형태 확인
print("Train data shape:", x_train.shape)
print("Test data shape:", x_test.shape)

출력:

Train data shape: (60000, 28, 28)
Test data shape: (10000, 28, 28)

이미지 예시:

MNIST 이미지 예시

(출처: 위키미디어)

3. 모델 구성

Keras의 Sequential API를 사용하여 간단한 신경망 모델을 구성합니다.

# 모델 구성
model = keras.Sequential([
    keras.layers.Flatten(input_shape=(28, 28)),  # 입력층 (28x28 이미지를 1D 배열로 변환)
    keras.layers.Dense(128, activation='relu'),  # 은닉층 (128개의 노드, ReLU 활성화 함수)
    keras.layers.Dropout(0.2),                   # 드롭아웃 (과적합 방지)
    keras.layers.Dense(10, activation='softmax') # 출력층 (10개의 노드, 소프트맥스 활성화 함수)
])

# 모델 요약 출력
model.summary()

출력:

Model: "sequential"
_________________________________________________________________
 Layer (type)                Output Shape              Param #   
=================================================================
 flatten (Flatten)           (None, 784)               0         
 dense (Dense)               (None, 128)               100480    
 dropout (Dropout)           (None, 128)               0         
 dense_1 (Dense)             (None, 10)                1290      
=================================================================
Total params: 101,770
Trainable params: 101,770
Non-trainable params: 0
_________________________________________________________________

4. 모델 학습

모델을 컴파일하고 학습 데이터를 사용하여 학습시킵니다.

# 모델 컴파일
model.compile(optimizer='adam',
              loss='sparse_categorical_crossentropy',
              metrics=['accuracy'])

# 모델 학습
history = model.fit(x_train, y_train, epochs=5, validation_data=(x_test, y_test))

출력:

Epoch 1/5
1875/1875 [==============================] - 5s 2ms/step - loss: 0.2960 - accuracy: 0.9140 - val_loss: 0.1421 - val_accuracy: 0.9576
Epoch 2/5
1875/1875 [==============================] - 4s 2ms/step - loss: 0.1430 - accuracy: 0.9578 - val_loss: 0.1005 - val_accuracy: 0.9693
...

학습 과정 시각화:

학습 과정 시각화

5. 모델 평가

테스트 데이터를 사용하여 모델의 성능을 평가합니다.

# 모델 평가
test_loss, test_acc = model.evaluate(x_test, y_test, verbose=2)
print(f"\nTest accuracy: {test_acc:.4f}")

출력:

313/313 - 0s - loss: 0.0756 - accuracy: 0.9771
Test accuracy: 0.9771

6. 모델 활용

학습된 모델을 사용하여 새로운 데이터에 대한 예측을 수행합니다.

# 테스트 데이터 예측
predictions = model.predict(x_test)

# 첫 번째 테스트 데이터 예측 결과 확인
print("Predicted label:", np.argmax(predictions[0]))
print("Actual label:", y_test[0])

출력:

Predicted label: 7
Actual label: 7

7. 추가 학습 및 개선

모델의 성능을 더욱 개선하기 위해 다음과 같은 방법을 시도할 수 있습니다:

  1. 은닉층의 수와 노드 수를 조정합니다.
  2. 학습률(learning rate)을 변경합니다.
  3. 데이터 증강(data augmentation)을 적용합니다.
  4. 더 복잡한 모델(CNN, RNN 등)을 사용합니다.

결론

이 글에서는 TensorFlow와 Keras를 사용하여 간단한 딥러닝 모델을 개발하는 방법을 단계별로 설명했습니다. MNIST 데이터셋을 활용하여 모델을 구성하고 학습하며, 모델의 성능을 평가하고 예측을 수행하는 과정을 다뤘습니다. 딥러닝은 다양한 분야에서 활용될 수 있는 강력한 기술이므로, 지속적인 학습과 실습을 통해 더욱 발전시켜 보세요.

참고 자료

20241229

TensorFlow와 Keras 소개 및 활용

TensorFlow와 Keras: 딥러닝을 위한 핵심 도구

TensorFlow와 Keras는 딥러닝 개발을 위한 강력한 오픈소스 라이브러리입니다. TensorFlow는 복잡한 수치 연산을 효율적으로 수행하는 데 적합하며, Keras는 고수준 API로 사용자가 간단하게 모델을 설계하고 학습할 수 있도록 돕습니다. 이 글에서는 TensorFlow와 Keras의 주요 특징과 사용법을 살펴보겠습니다.

TensorFlow와 Keras 시작하기

TensorFlow와 Keras는 Python 기반이며, 설치 후 간단한 코드를 통해 쉽게 활용할 수 있습니다.

설치 및 버전 확인

pip install tensorflow

import tensorflow as tf
from tensorflow import keras

print("TensorFlow 버전:", tf.__version__)

MNIST 데이터셋으로 딥러닝 모델 구축

아래는 MNIST 데이터셋을 사용하여 간단한 딥러닝 모델을 구축하고 학습시키는 코드입니다.

import numpy as np
from tensorflow import keras
import tensorflow as tf

# MNIST 데이터셋 로드
(x_train, y_train), (x_test, y_test) = keras.datasets.mnist.load_data()
x_train, x_test = x_train / 255.0, x_test / 255.0

# 모델 정의
model = keras.Sequential([
    keras.layers.Flatten(input_shape=(28, 28)),
    keras.layers.Dense(128, activation='relu'),
    keras.layers.Dropout(0.2),
    keras.layers.Dense(10, activation='softmax')
])

# 모델 컴파일
model.compile(optimizer='adam',
              loss='sparse_categorical_crossentropy',
              metrics=['accuracy'])

# 모델 학습
model.fit(x_train, y_train, epochs=5)

# 모델 평가
model.evaluate(x_test, y_test)

데이터 시각화

학습 데이터를 시각화하여 모델이 처리하는 데이터를 직관적으로 이해할 수 있습니다.

import matplotlib.pyplot as plt

plt.imshow(x_train[0], cmap='gray')
plt.title(f"Label: {y_train[0]}")
plt.show()

텐서(Tensor)와 텐서플로 연산

TensorFlow의 핵심은 텐서입니다. 텐서는 다차원 배열로, 모델 학습과 데이터 처리를 위한 기본적인 데이터 구조입니다.

텐서 생성

import tensorflow as tf

# 상수 텐서
tensor_constant = tf.constant([[1, 2], [3, 4]])
print("상수 텐서:", tensor_constant)

# 변수 텐서
tensor_variable = tf.Variable([[1, 2], [3, 4]])
print("변수 텐서:", tensor_variable)

# 랜덤 텐서
tensor_random = tf.random.normal([2, 2], mean=0, stddev=1.0)
print("랜덤 텐서:", tensor_random)

텐서 연산

TensorFlow는 다양한 수학 연산을 지원합니다.

# 행렬 곱
a = tf.constant([[1, 2], [3, 4]])
b = tf.constant([[5, 6], [7, 8]])
result = tf.matmul(a, b)
print("행렬 곱 결과:", result)

# 텐서 브로드캐스팅
c = tf.constant([1, 2, 3])
d = tf.constant([[1], [2], [3]])
broadcasted_result = c + d
print("브로드캐스팅 결과:", broadcasted_result)

Keras를 활용한 심화 작업

사용자 이미지로 테스트

사용자 이미지를 학습된 모델에 입력하여 모델 성능을 테스트할 수 있습니다. 예를 들어, 손으로 작성한 숫자를 이미지로 저장하고 이를 입력 데이터로 사용합니다.

from PIL import Image
import numpy as np

# 이미지 불러오기
image = Image.open("handwritten_digit.png").convert("L")
image = image.resize((28, 28))
image = np.array(image) / 255.0

# 차원 추가 및 예측
image = np.expand_dims(image, axis=0)
prediction = model.predict(image)
print("예측된 클래스:", np.argmax(prediction))

TensorFlow와 Keras의 장점

  • 직관적인 API: 초보자부터 전문가까지 쉽게 사용할 수 있도록 설계되었습니다.
  • 다양한 플랫폼 지원: CPU, GPU, TPU 등 다양한 하드웨어에서 실행 가능합니다.
  • 확장성: 복잡한 모델부터 간단한 실험까지 모두 처리할 수 있는 유연한 구조를 제공합니다.